Recently I did a post about the Ambler tangle in the Entanglement library. Ambler uses an element called a box spiral. It turns out, box spirals appear in several tangles, most notably the Box Spirals tangle. In this post, we’ll talk about the Entanglement BoxSpiral class, which implements the Box Spirals tangle.
The box spiral used in Ambler as it is implemented in Entanglement is very specific. It consists of nine lines, and always rotates counter-clockwise. Therefore it can only be drawn in four orientations, with the spiral starting from one of the four corners of its enclosing box.
The Box Spirals tangle needs a more complex spiral. We want to have clockwise as well as counter-clockwise spirals. We want to draw them at any angle. We want to potentially use many more lines to draw a tighter, denser spiral. To do this, we’ll abstract out the box spiral from Ambler and make it a standalone element, to which we can pass parameters to vary these properties.
BoxSpiralElement
The result is the BoxSpiralElement class in Entanglement. Here are some examples, along with the program that created them:

const width = 600;
const height = 100;

function setup() {
    createCanvas(width, height);
    background(255);
}

function draw() {
    let g = createGraphics(width, height);

    let bse1 = new BoxSpiralElement(g, new Point(50, 50), {});
    bse1.draw();
    g.text('bse1', 50, 90);

    let bse2 = new BoxSpiralElement(g, new Point(150, 50), {
        divisions: 8,
        rotation: 'cw',
        startCorner: 'random',
    });
    bse2.draw();
    g.text('bse2', 150, 90);

    let bse3 = BoxSpiralElement.newFromCoordinates(g, new Point(225, 25), new Point(275, 25), new Point(275, 75), new Point(225, 75), {
        divisions: 10,
        rotation: 'cw',
        startCorner: 'random',
    });
    bse3.draw();
    g.text('bse3', 250, 90);

    let bse4 = BoxSpiralElement.newFromCoordinates(g, new Point(325, 25), new Point(375, 25), new Point(375, 75), new Point(325, 75), {
        divisions: 10,
        rotation: 'cw',
        startCorner: 'random',
        fillColor: 'yellow',
        strokeColor: 'red',
    });
    bse4.draw();
    g.stroke(0);
    g.fill(0);
    g.text('bse4', 350, 90);

    let bse5 = BoxSpiralElement.newFromCoordinates(g, new Point(400, 25), new Point(475, 30), new Point(475, 60), new Point(425, 75), {
        divisions: 8,
    });
    bse5.draw();
    g.text('bse5', 450, 90);

    let bse6 = BoxSpiralElement.newFromCoordinates(g, new Point(575, 25), new Point(525, 25), new Point(575, 75), new Point(525, 75), {
        divisions: 9,
    });
    bse6.draw();
    g.text('bse6', 550, 90);

    image(g, 0, 0);
    noLoop();
}
As you can see, this program generates and draws six BoxSpiralElements, labels bse1 through bse6. Before you read any further, you’ll want to understand the concept of divisions, which is an option for this element. In the case of a BoxSpiralElement, divisions refers to the number of line segments each side of the square is divided into to create the points for the spiral.
- bse1 - This is built using the standard constructor with no options. Therefore it is drawn at the default size of 50 pixels, and it has 4 divisions.
- bse2 - This one is also built using the standard constructor, but uses 8 divisions, creating a tighter spiral. Also, the rotation is set to ‘cw’, so the spiral spins the opposite direction, and the start corner is set to random. In this case, the spiral started in the upper right (“ne”) corner.
- bse3 - This is the same as the last example, although with divisions set to 10. However, it uses the alternate constructor. The standard constructor takes a center point, as well as a size, and can only generate square spirals. The alternate constructor takes the four corner points of the box in which it is drawn. This allows you to arrange the points in something other than a square, although in this example, the points do define a square.
- bse4 - The same as the last example, except setting the stroke and fill colors. Normally, there is no fill color.
- bse5 - This is an example of distorting the spiral into something other than a square.
- bse6 The sixth example does something weird: the points are out of order and don’t define a quadrilateral. The corners should be specified as compass directions in a specific order: ’nw’, ’ne’, ‘se’, ‘sw’. In this example, the ’nw’ and ’ne’ corners are swapped, creating a twisted image. Fun Fact: If you do this, you need an odd number of divisions. Otherwise, because of the twist, some of the “horizontal” and “vertical” lines will end up parallel to each other, and the program will crash when it tries to figure out where they intersect!
BoxSpiral Tangle
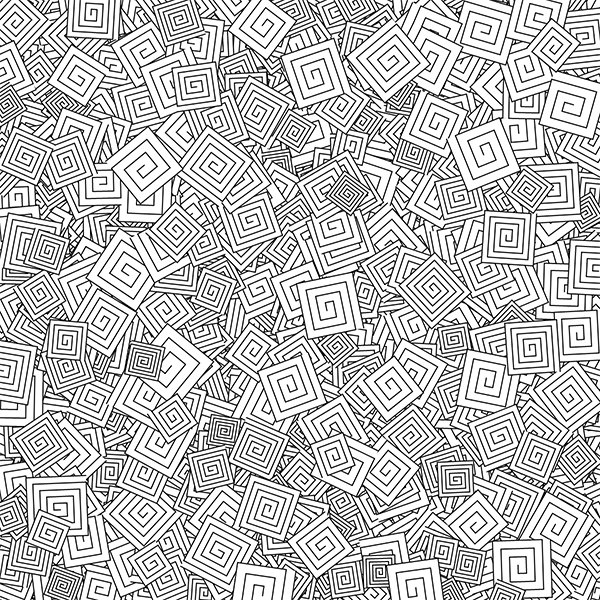
All the hard work is being done by BoxSpiralElement, so creating a BoxSpirals tangle is trivial. Just draw a bunch of BoxSpiralElements randomly over the area you want to cover! By default BoxSpiralElements are transparent, so of course you’ll want to set a fill color when you do this so you won’t be able to see through the ones on top.
The BoxSpiral class in Entanglement handles this for you. This example uses BoxSpiral to generate an image like the one at the top of this post.
const width = 600;
const height = 600;

function setup() {
    createCanvas(width, height);
    background(255);

    const bs = new BoxSpirals([
        new Point(0, 0),
        new Point(width, 0),
        new Point(width, height),
        new Point(0, height),
    ], {
        background: 'white',
        divisions: new Range(6, 10),
        rotation: 'random',
        startCorner: 'random',
        size: new Range(30, 60),
    });
    image(bs.g, bs.origin.x, bs.origin.y);
}
Notes
If you want to try this example, you need version 0.0.4 of Entanglement:
<script src="https://cdn.jsdelivr.net/gh/tektsu/entanglement@0.0.4/dist/entanglement.js"></script>
There is a major change in how tangles are declared with this version. In the past, passed a width and a height to the constructor – something like this:
const bs = new BoxSpirals(width, height, {
        background: 'white',
        divisions: new Range(6, 10),
        rotation: 'random',
        startCorner: 'random',
        size: new Range(30, 60),
    });
Then there was a paste() function to paste the finished tangle onto the canvas at a particular location. The major limitation with this approach is that the tangles are always square. Now, instead of passing a width, and a height, we pass an array of points, to be interpreted as the vertices of a polygon on the canvas. This will be used to generate a mask, and only the portion of the tangle inside the polygon will be added to the canvas. The tangle is still square, it’s just that it is not necessarily all displayed. The width and height as well is the position on the canvas are calculated from the polygon, and are available as variables in the Tangle object. We aren’t making much use of that capability yet in this post, but next week’s post will have an example that does use it!
There are same changes to the class names in this version. Tangle elements now all have “Element” in the name. So “Dot” is now “DotElement”, “Aah” is now “AahElement”, etc. From now on, all the element classes will be named this way. Aside from being consistent, this also paves the way for the “Aahs” to be renamed “Aah”, so the name matches the real tangle it is trying to emulate.
Entanglement documentation is here . It shows all the classes in Entanglement so far, including BoxSpiralElement and BoxSpirals . If you are brave and want to look at the Javascript source code, there are links to it on those pages.
If you want to make changes to the source code to try out your own ideas, it is at in Github .
If you are wondering whether Ambler now uses the BoxSpiralElement, it does! It works exactly as it did before, but no longer draws its own box spirals.
Have fun!