The Entanglement library has a very few (so far) tangle patterns built in which can be used to create Zentangles. New ones get added to the library as I get to them, but you (yes, YOU) as a user can create them too. Warning! This post is mostly Javascript code! If that’s not your thing, avert your eyes now! You need version 0.0.5 of Entanglement to follow along:
<script src="https://cdn.jsdelivr.net/gh/tektsu/entanglement@0.0.5/dist/entanglement.js"></script>
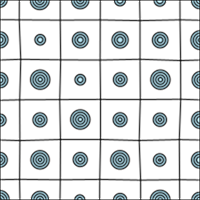
In this post, we’ll create a simple grid-based tangle pattern, then use it in a Zentangle. The tangle we’ll create is not particularly interesting, and is not a “real” Zentangle (as far as I know.) It’s just an example to show the process. The Entanglement library only supports two general kinds of tangles so far: a pattern of tangle elements placed randomly on the canvas, such as Aah or BoxSpirals, or a grid with some kind of pattern, such as Ambler or Emingle. We’ll create a grid tangle in this case. We want it to look something like this:
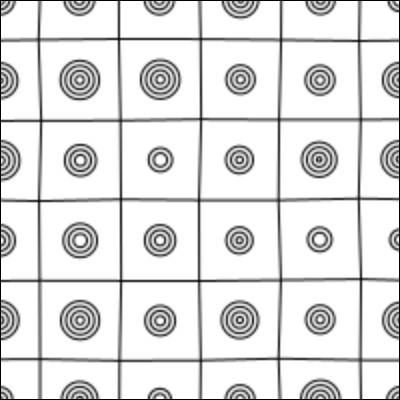
As you can see, it is, as promised, a grid. In the center of each square, is a series of concentric circles. The size and number of circles varies randomly. For no particular reason, let’s call this tangle Eks.
To create an Eks class, extend the Tangle class. In the Entanglement library the Tangle class is the base class of all tangles. It has certain capabilities baked into it, which we can use in our tangles without having to reinvent them.
class Eks extends Tangle {
    constructor(mask, options) {
        if (typeof options === 'undefined') options = {}
        options.allowableOptions = {
        };
        super(mask, options);
    }
}
Tangles in the Entanglement library are generally created entirely in the constructor, which is the method that is called each time an instance of the class is created. So, as in this example, the constructor is often the only method in the class.
The example above shows the constructor, which contain a few basic statements which all tangles will have. The constructor will be passed a mask, which is a
Polygon
, or an array of
Points
which will be interpreted as a list of vertices for a Polygon. It may also be passed an optional options object. Options come from the base class,
Tangle
, or options can be added to the class being built. In the example above, there are a few statements already. First, if no options were passed in, an empty options object is created. Second, we add to that object a list of allowable options for this new tangle. In this example, there aren’t any yet. Third, we call the Tangle class constructor using super(), passing in the mask and the options object.
That call to super() is important, as it does a lot of setup tasks. Notably, it figures out the bounding rectangle from the mask polygon. The bounding rectangle is the area where the tangle will be drawn, although parts of it, the parts outside the polygon, will ultimately not be drawn on the canvas. The constructor adds all of the options passed in as instance variables. So if there were an option passed in called blargle and it had the value of 3, then there would be a variable called this.blargle, with the initial value of 3, and this variable would be available for you to use in your new tangle. The Tangle constructor also creates a graphics buffer the size of the bounding rectangle; this is where you will draw anything that is part of the tangle.
As we want the Eks tangle to be a grid-style tangle, we need to set that option in the constructor:
    constructor(mask, options) {
        if (typeof options === 'undefined') options = {}
        options.grid = true;
        if (typeof options.gridShow === 'undefined') {
            options.gridShow = true;
        }
        options.allowableOptions = {
        };
        super(mask, options);
    }
Here, after making sure we really have an options object, we set the grid option to true. We also set the gridShow option to true, but only if it isn’t already set. This has the effect of letting a user of the Eks class set the option to false, but if it is left off, it will default to true. What does gridShow do? It tells the Tangle class whether or not to draw the actual grid as part of the tangle, and is just one of many options which affect how grid-style tangles are drawn.
When the Tangle constructor, through the call to super() sees that the grid option is true, it generates all the points that define the grid, making them available to us for use in the Eks tangle.
The only other things needed in the Eks class are a method which actually build the tangle, and then a call to execute() to do work of drawing. The execute() method does several things, but most importantly, it calls build() method we defined. Here is the completed class:
class Eks extends Tangle {

    constructor(mask, options) {
        if (typeof options === 'undefined') options = {}
        options.grid = true;
        if (typeof options.gridShow === 'undefined') {
            options.gridShow = true;
        }
        options.allowableOptions = {
        };
        super(mask, options);

        this.build = function() {
            const maxStartingRadius = Math.min(this.gridXSpacing, this.gridYSpacing)/2
            const startingRadius = new Range(maxStartingRadius, maxStartingRadius/2);
            for (let r = 0; r < this.gridPoints.length - 1; r++) {
                for (let c = 0; c < this.gridPoints[r].length - 1; c++) {
                    const nw = this.gridPoints[r][c];
                    const ne = this.gridPoints[r][c + 1];
                    const se = this.gridPoints[r + 1][c + 1];
                    const sw = this.gridPoints[r + 1][c];
                    const center = new Point((nw.x+ne.x+se.x+sw.x)/4, (nw.y+ne.y+se.y+sw.y)/4);
                    this.g.fill('white');
                    let radius = startingRadius.rand();
                    while (radius > 2) {
                        this.g.circle(center.x, center.y, radius);
                        radius -= 5;
                    }
                }
            }
        };

        this.execute();
    }
}
As you can see, we have added the build() method in the form of an anonymous function assigned to the build instance variable, and then made a call to execute(). Let’s take a closer look at the build() method – this is where all the work unique to Eks happens!
First, we know we want to draw some concentric circles in the center of each grid square, so we decide what size to make those circles. We set our max size to half of gridXSpacing or gridYSpacing, whichever is smaller. These two options both default to 40 pixels if no other value has been passed in. Then we create a
Range
object describing a range of that maximum to half of that maximum. So, given the default grid spacing of 40, the starting radius range will be from 10 to 20.
Next we cycle through all the grid points, considering the 4 points that make up each square of the grid, and calculating the center of that square. Note that these “squares” aren’t always squares. Of course they can be rectangles if the gridXSpacing and gridYSpacing are not equal, but also the exact position of each grid point can be varied randomly, using the gridVary option, so each square could end up as a parallelogram, a trapezoid, or any other quadrilateral.
Then we set the fill to white, choose a random starting radius, and draw our circles. For each circle we draw, we reduce the radius by 5 and draw another, until the radius is less than 2. Then we move on to the next square and repeat.
That’s all there is to it! This program used Eks to draw the sample image above:
const width = 200;
const height = 200;
function setup() {
    createCanvas(width, height);
    background(255);
    const t = new Eks([
        new Point(0, 0),
        new Point( width, 0),
        new Point(width, height),
        new Point(0, height),
    ], {});
    image(t.g, 0, 0);
}
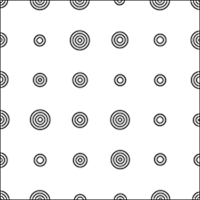
Because of the features atleady part of the Tangle base class, we can get quite a bit of variation without ant futher additions to Eks. For example, we can just not draw the grid, leaving only the circles:
const width = 200;
const height = 200;
function setup() {
    createCanvas(width, height);
    background(255);
    const t = new Eks([
        new Point(0, 0),
        new Point( width, 0),
        new Point(width, height),
        new Point(0, height),
    ], {
        gridShow: false,
    });
    image(t.g, 0, 0);
}
Then we could set the background to some other color, and distort the grid a great deal with a large value of gridVary:
const width = 200;
const height = 200;
function setup() {
    createCanvas(width, height);
    background(255);
    const t = new Eks([
        new Point(0, 0),
        new Point( width, 0),
        new Point(width, height),
        new Point(0, height),
    ], {
        gridShow: false,
        gridVary: 50,
        background: color(128, 0, 0),
    });
    image(t.g, 0, 0);
}
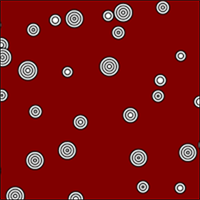
In this case, the gridVary is considerably more than the grid spacing, so the centers look random; and any sense of columns and rows is lost.
You will notice that the circle are always white. Let’s add an option to let them be any color. That is a simple change. Here is the new Eks class:
class Eks extends Tangle {

    constructor(mask, options) {
        if (typeof options === 'undefined') options = {}
        options.grid = true;
        if (typeof options.gridShow === 'undefined') {
            options.gridShow = true;
        }
        options.allowableOptions = {
            circleColor: 'white',
        };
        super(mask, options);

        this.build = function() {
            const maxStartingRadius = Math.min(this.gridXSpacing, this.gridYSpacing)/2
            const startingRadius = new Range(maxStartingRadius, maxStartingRadius/2);
            for (let r = 0; r < this.gridPoints.length - 1; r++) {
                for (let c = 0; c < this.gridPoints[r].length - 1; c++) {
                    const nw = this.gridPoints[r][c];
                    const ne = this.gridPoints[r][c + 1];
                    const se = this.gridPoints[r + 1][c + 1];
                    const sw = this.gridPoints[r + 1][c];
                    const center = new Point((nw.x+ne.x+se.x+sw.x)/4, (nw.y+ne.y+se.y+sw.y)/4);
                    this.g.fill(this.circleColor);
                    let radius = startingRadius.rand();
                    while (radius > 2) {
                        this.g.circle(center.x, center.y, radius);
                        radius -= 5;
                    }
                }
            }
        };

        this.execute();
    }
}
The only change is that we have added an option called circleColor, which defaults to white. Then we passed circleColor to the fill command where we draw each set of circles. If we don’t pass in the option, the class works the same as before, but if you do pass it in set to a color, the circles will be filled with that color:
const width = 200;
const height = 200;
function setup() {
    createCanvas(width, height);
    background(255);
    const t = new Eks([
        new Point(0, 0),
        new Point(width, 0),
        new Point(width, height),
        new Point(0, height),
    ], {
        circleColor: 'lightblue',
    });
    image(t.g, 0, 0);
}
Of course, the circles are still drawn in black, which is the default; they are only filled in with whatever circleColor is. It would be possible to pass in options to change that as well. Other things that could be changed with options include the starting radius of the circle, putting the circle some place other than the center of the square, etc. It’s all up to YOU, the author of the tangle to decide what should be allowed.
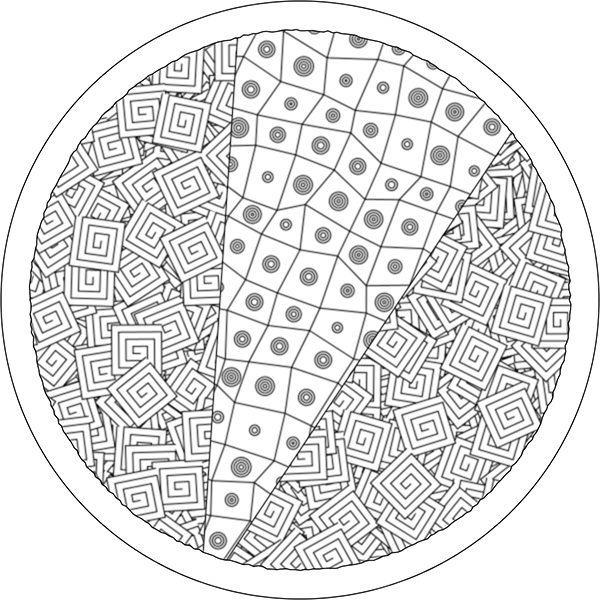
This is all very nice, but the really cool thing we can do with our custom tangle is use it in a complete Zentangle along with other tangles. Here is an example:
const width = 200;
const height = 200;
function setup() {
    const z = new Zentangle(600, 'circle', {
    });
    z.addTangle(new BoxSpirals(z.getFullMask(), {
        background: z.background,
        divisions: 7,
    }));
    const a=45;
    z.addTangle(new Eks(new Polygon([
        new Point( 2*z.width/5, 0),
        new Point(z.width, 0),
        new Point(z.width/3, z.height),
    ]), {
        background: z.background,
        tangleRotate: 20,
        gridVary: 10,
    }));

    z.draw();
}
In this Zentangle, which just for fun is circular, we fill in the entire background with BoxSpirals, then add a triangle space filled with Eks on top. The Eks grid is slightly distorted. As art, it isn’t much, but as an example of how to use Tangle classes to make a Zentangle, it works just fine!
If you made it this far, congratulations! You now have a basic understanding of how to build new tangle patterns using the Entanglement library. Please use this power only for good!
Look at the source code for the Aah , BoxSpirals , Ambler and Emingle classes for more examples.
Have fun!