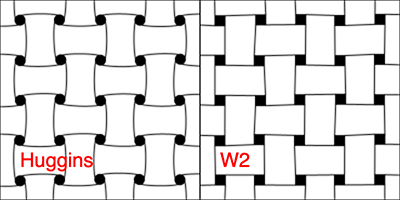
Huggins and W-2 have appeared in the Entanglement library! Huggins and W-2 both look like they have been woven but are really just shapes on a grid connected by lines according to a few simple rules. The difference between them is that Huggins connects circles with curved lines, while W-2 connects squares with straight lines.
In this post, I’ll talk about how I built Huggins (once you build Huggins, W-2 is pretty easy to add) and show some examples of how both are used.
Huggins
Huggins is relatively easy to draw by hand. It’s just a matter of drawing curved lines between circles, like this:
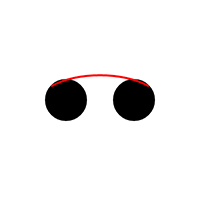
This is repeated over and over again until all the circles are connected in a specific pattern.
Drawing this in p5.js is a little bit harder, as curves require a little extra work. If you have two points and want a curved line in between them, you need to provide a bit more information so the computer knows which direction and how much to curve. This information is provided through control points.
The p5.js curve() function needs to be passed 4 points (8 parameters, those being the x and y values of the 4 points.) It will calculate a curve that will pass through all 4 points, but will only draw the calculated curve between the 2nd and 3rd points. So the positions of the 1st and 4th points affect the curve that is drawn between the 2nd and 3rd points.
The points we are drawing from and to are not the centers of the circles, but are near the tops of the circles (or near the bottoms, depending on which curve is being drawn.) But the aren’t exactly at the tops either. For Huggins, I have chosen to use points the are 45 degrees away from the tops. So in this example, we are drawing from a point 45 degrees counterclockwise from the top of the first circle to a point 45 degrees clockwise from the top of the 2nd circle.
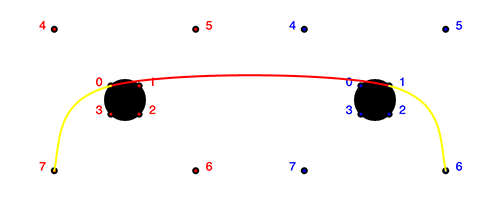
To draw all the curves in Huggins, we need to calculate eight points for every circle: four points on the edge of the circle, 90 degrees apart, and four points outside the circle, also 90 degrees apart. These are shown in red in this image, and are numbered for reference.
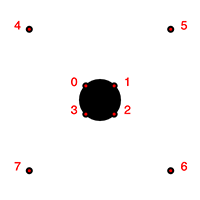
So to draw a curve like in the example above, curving up from the top of the first circle and down to the top of the second circle, the four points we need for the curve() function are point 7 on the first circle (first control point), point 0 on the first circle (start of curve), point 1 on the second circle (end of curve), and point 6 on the second circle (second control point).
Using the eight points we’ve defined for each circle, all the different curves necessary for Huggins can be drawn. Increasing the distance of the control points, points 7 and 6 in this example, from the circle will increase the curvature. A distance of about 5 times the radius of the circle gives a slight curvature. A distance of 100 times the radius gives a highly distorted curve, and we don’t have a Huggins tangle anymore!
You can see the finished source code for the Huggins class
here
.
W-2
After creating Huggins, W-2 is trivial. Instead of circles we draw squares, and we don’t need the eight calculated points, we just need four: the corners of the square. Then we just draw straight lines using the same pattern as in Huggins.
You can see the finished source code for the W2 class
here
.
Using Huggins and W-2
The Huggins and W2 classes are very similar. The circles (squares for W2) are referred to as holes in the source code and the options, since they look like holes in the woven patterns these classes produce.
In Huggins there are several options. The holeDiameter option sets the size of the circles, the holeFillColor options sets the color of the circles. You can decide not to draw the holes at all by setting holesShow to false. In this case only the lines will be drawn, which can be an interesting effect. There is also a curve options which is set to a value specifying how many times the size of the radius the control points should be from the center of the circle. These options can be found in the
documentation
. Of course, all the Tangle class options could be used as well. In particular, since this is a grid-style tangle, the grid options are key to how Huggins looks when it is drawn.
W2 has the same options, except that holeDiameter becomes holeSize (squares don’t have diameters), and for obvious reason, there is no curve option. The W-2 options can be found in the
documentation
.
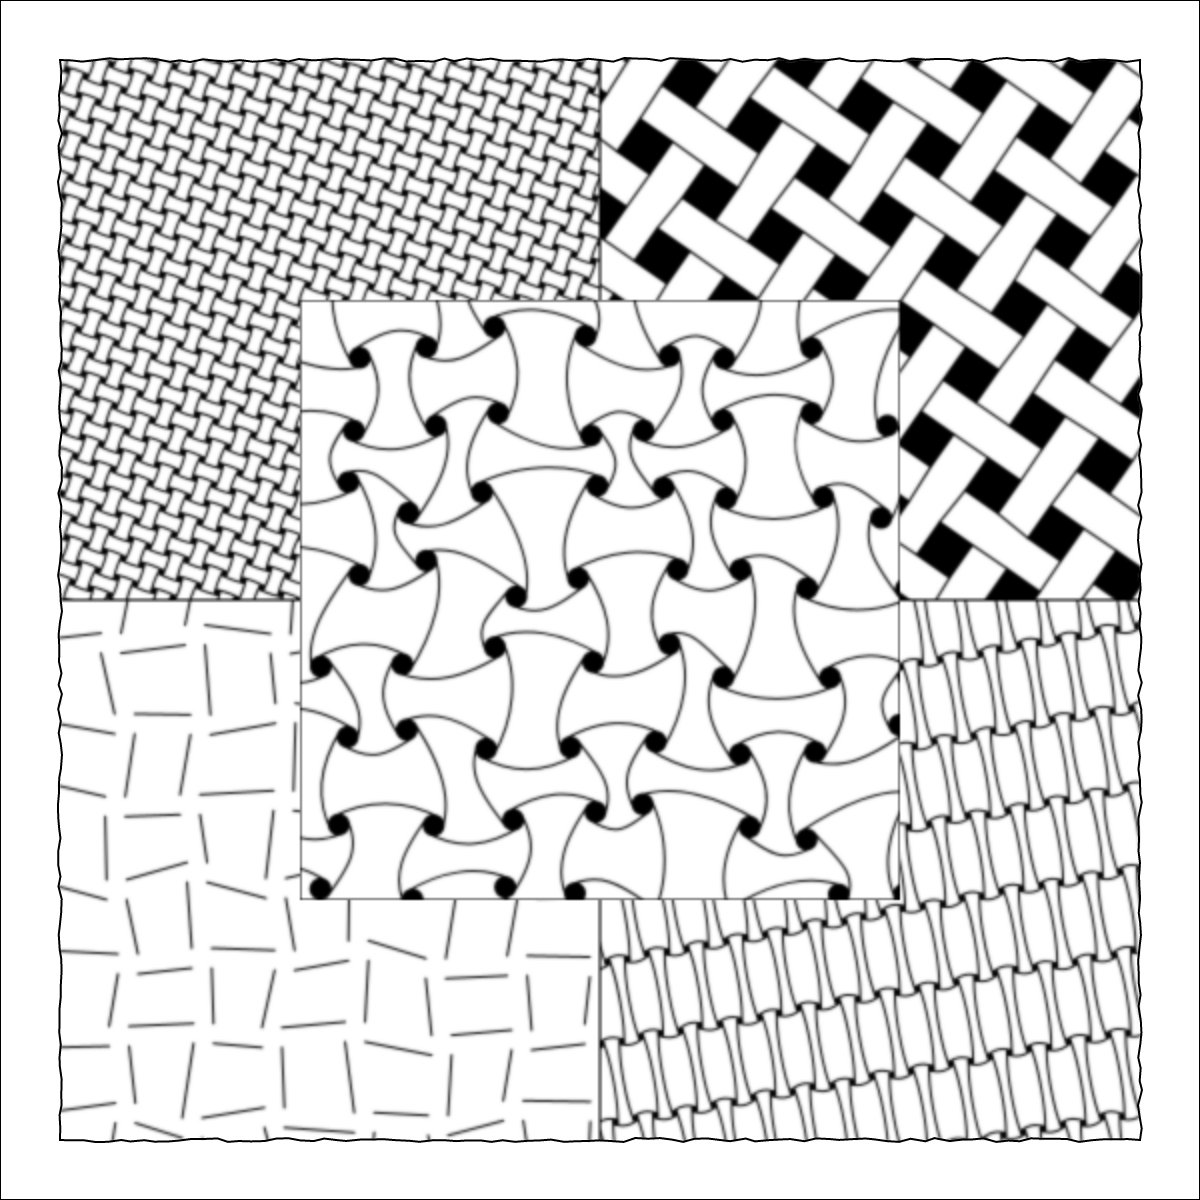
Here is an example Zentangle drawn with Huggins and W-2. This program produced the image at the top of this post.
function setup() {
    const z = new Zentangle(600, 'square', {
    });
    z.addTangle(new Huggins(new Polygon([
        new Point(0, 0),
        new Point(z.width/2, 0),
        new Point(z.width/2, z.height/2),
        new Point(0, z.height/2),
    ]), {
        background: z.background,
        gridSpacing: 10,
        tangleRotate: 20,
    }));
    z.addTangle(new W2(new Polygon([
        new Point(z.width/2, 0),
        new Point(z.width, 0),
        new Point(z.width, z.height/2),
        new Point(z.width/2, z.height/2),
    ]), {
        background: z.background,
        holeSize: 20,
        tangleRotate: 35,
    }));
    z.addTangle(new W2(new Polygon([
        new Point(0, z.height/2),
        new Point(z.width/2, z.height/2),
        new Point(z.width/2, z.height),
        new Point(0, z.height),
    ]), {
        background: z.background,
        gridVary: 5,
        holesShow: false,
    }));
    z.addTangle(new Huggins(new Polygon([
        new Point(z.width/2, z.height/2),
        new Point(z.width, z.height/2),
        new Point(z.width, z.height),
        new Point(z.width/2, z.height),
    ]), {
        background: z.background,
        curve: 15,
        tangleRotate: -10,
        gridXSpacing: 10,
    }));
    z.addTangle(new Huggins(new Polygon([
        new Point(z.width/4, z.height/4),
        new Point(3*z.width/4, z.height/4),
        new Point(3*z.width/4, 3*z.height/4),
        new Point(z.width/4, 3*z.height/4),
    ]), {
        background: z.background,
        curve: 15,
        gridVary: 10,
    }));

    z.draw();
}
To run this example yourself, you will need v0.0.6 of the Entanglement library:
<script src="https://cdn.jsdelivr.net/gh/tektsu/entanglement@0.0.6/dist/entanglement.js"></script>
Entanglement is expanding! Have fun playing with it!