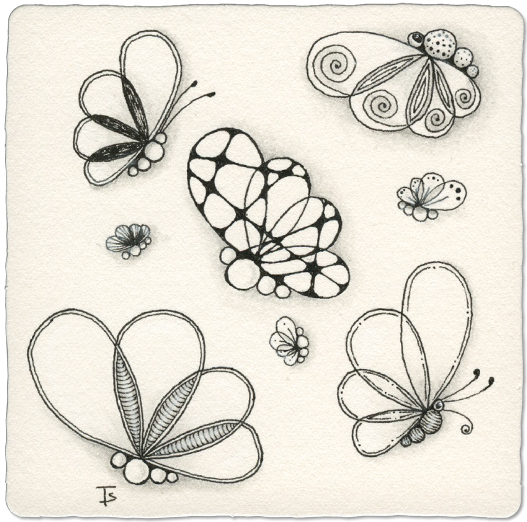
Inktober Tangles - Day 11 - B-Fly by Paz Munoz Camacho CZT
Nothing like a garden full of B-Flies! This is a fun, easy to draw tangle. While the shapes are simple, there’s plenty of room to add your own embellishments. I really enjoyed figuring out different things to do with each “bug”.
This is another one that I’m adding to my collection of random tangles for meditative tiles.
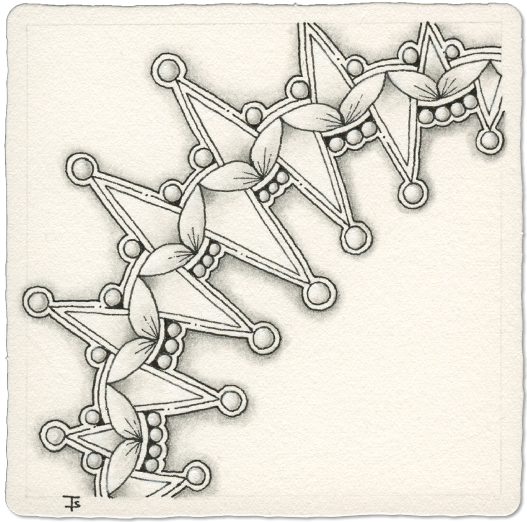
Inktober Tangles - Day 10 - Zenith by Zentangle
I’ve drawn Zenith many times, but never before as a monotangle. This time, I wanted to take the opportunity to draw it much larger than I normally do, and to make it “fancy”.
It was fun to figure out what I wanted to do with each area of exploration offered, but still stay with the basic idea of the original tangle.
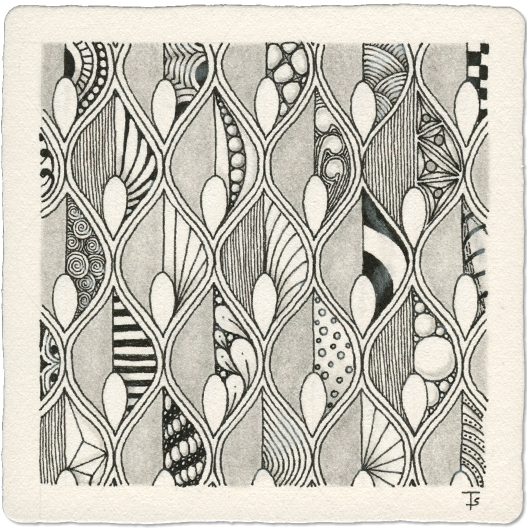
Inktober Tangles - Day 9 - Lilife by Barbara Styer CZT
This tangle is new to me. It can be drawn as individual leaves, or, as I did here, in an Ogee grid. I chose the grid so that I could create a monotangle of sorts, and to leave lots areas for embelishment.
Some of the designs used for decoration are other tangles, some are parts of fragments, and some are just ideas from my imagination.
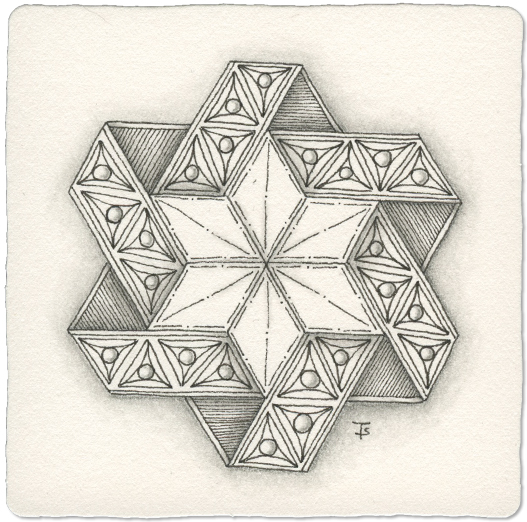
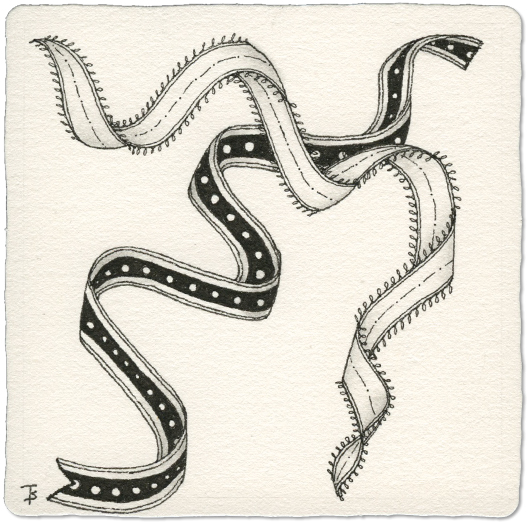
Inktober Tangles - Day 08 - Chomborós by Tania Ferriol Jover
Chomborós is a tangle that produces a beautiful, bordered, 6-pointed star. It is important to follow the Step-Out carefully for the best results.
For my version, above, I treated the outside border as if it was a folded ribbon, with a decorative side, using Tripoli for the design. On the plain side, I used vertical lines to show the wrong side of the ribbon.
Inktober Tangles - Day 07 - Rambles by Zentangle
Rambles is a lovely tangle. It can be used to frame a central motif, or it can be it’s own focal point.
That being said, for me, this simple tangle is a challenge. For some reason, my brain doesn’t want to turn my curved squiggle into a ribbon. I have to do all the steps after that initial line very, very carefully and slowly. Even then, I often make mistakes.
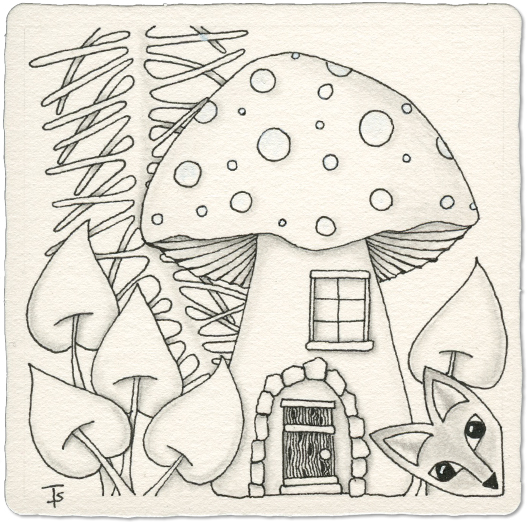
Inktober Tangles - Day 06 - Auravox by Stephanie Jennifer CZT
I am breaking from creating monotangles for Inktober with this tile. Instead of drawing a single tangle in vairous styles, this tile is what is called a “ZIA” or “Zentangle Inspired Art”.
There is a single AuraVox in the lower, right-hand corner. But that made me think of Forest Core, which lead me to the Mushroom house. Then I used two tangles, Poke leave and Locar to represent plants found on the shady forest floor.
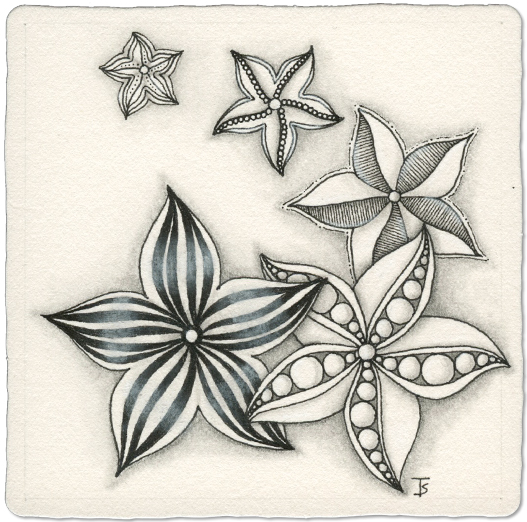
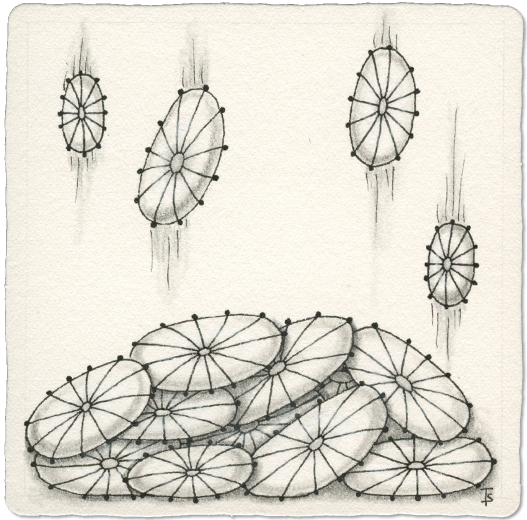
Inktober Tangles - Day 05 - StarRite by Nina Dreher-Goddertz
In terms of Zentomology, StarRite is a bottanical, medallion type of tangle. It’s not difficult to draw, but there’s lots of room for embellishment.
You could fill a space with smaller, overlapping stars, or create a focal point, large star. It could be a star in space, or a starfish in an ocean scene.
This tangle will be added to my repertoire of tangles.
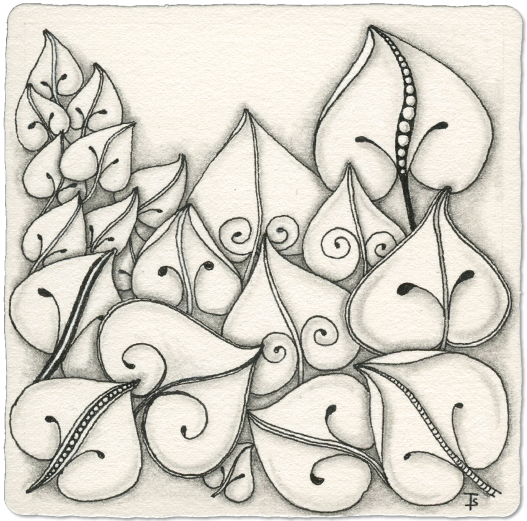
Inktober Tangles - Day 4 - Toodles by Zentangle
Toodles is a wonderful, leaf-shaped organic tangle. While it has a basic shape, you can play around with it and create a lot of variation without altering it very much.
This tile was fun to create, varying the size, the treatment of the center rib, adding a spot where the leaf folds over, or changing the look of the little Fescu bits of each leaf! I also shaded some of them differently than I normally would.
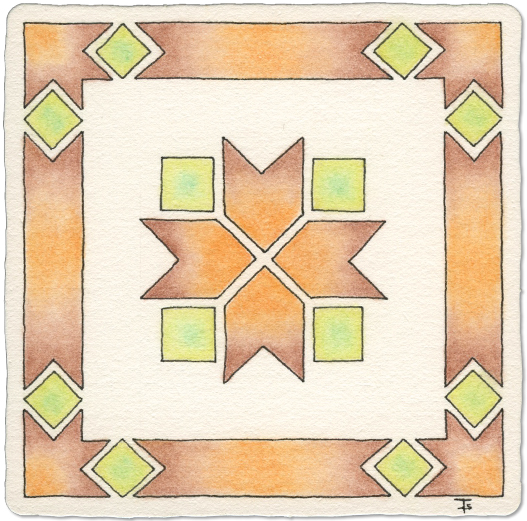
Inktober Tangles - Day 3 - Melvina by Nadine Roller CZT
This is a totally new tangle to me. I had never heard of it until I saw it on the Inktober Tangles list. It reminds me of Native American designs or quilt designs.
Here, I drew this tangle with no modifications. I added some simple, ombre color using pastel pencils.
I will play with this some more in the future to see what can be done combining it with other tangles, creating tangelations and adding texture to create more depth and complexity!
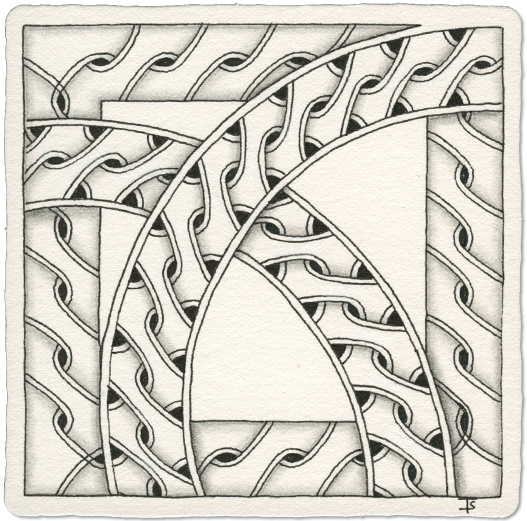
Inktober Tangles - Day 2 - Speedwayz by Carla Jooren CZT
Today’s tangle, Speedwayz, isn’t particularly difficult to draw, once you know where to start! Here, I’ve drawn two different versions. The square border is the basic version. In the arches is the Speedwayz Extra version. It is the shading that really makes this tangle stand out with dimension and depth.
Zentangle drawn on a standard, white Zentangle tile using a black, Micron pen. Shading done with graphite pencil. Highlights created with white chalk pencil.
Inktober Tangles - Day 1 - Festune by Zentangle
For my Inktober 2025 Project, I am following the tangle list from Stephanie Jennifer, CZT . If you want to know more about it, you can click on her name to go to her website.
Today’s tangle is Festune. It looks a bit like a fancy cushion that you might use to decorate your living room. Depending on how you draw them, they might look a bit like a paper umbrella! I love to draw them piling up as if they were thrown or dropped into a haphazard pile.
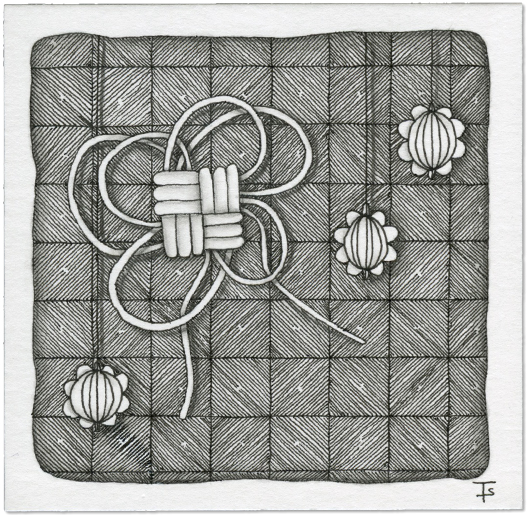
I had drawn the Mak-Rah-Mee knot on this tile a while back. I set it on a shelf, leaning up against some journals and then I didn’t do anything else with it.
Today, I thought that it needed finishing, as the month of September is ending. I cleaned up my work area over the weekend, and wanted to finish up any tiles I found.
I added the Bulb Lanterns, and then I had to think about what to do with the background. I wanted a grid tangle and it needed to make the knot and lanterns stand out. After searching for a bit, I settled on Yincut. It takes a while to make all those lines but it is also fun and meditative to do. Also, I got up very early today, so I had the time for it.
No string, specifically chosen tangles.
Over the weekend, we had some pretty bad storms. Lots and lots of lightning, wind, hail and heavy rain.
We lost power for many hours because the power poles, about a block away, fell down during one of the wind events.
When that happens, I can’t work in my studio or office because it is too dark. I can’t post anything because… no computer, which is not a surprise. In my case, I aslo have no phone because I live in a “cellular hole”. That’s also not a surprise, since my phone never works at my house!
No string, random tangles.
Squid was the first tangle that came up randomly, so I decided to go without a string, using the “arms” of Squid for the divisions of my tile.
But then, the universe decided that today was “challenge day”, and delt me three medallion tangles in a row. Still thinking this could work as a kind of underwater scene, I added those to the tile. Hmmm.
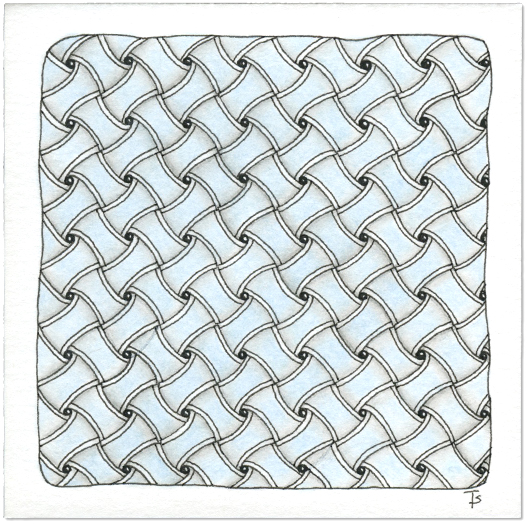
Fragment D4 applied to a grid. This almost looks like Huggins! But there is a small difference.
Some days I don’t have a lot of time to tangle because other things are going on. On those days, I often do a tile with grid tangles. For me, they are simpler to work with, in particular if done as a monotangle.
So for this tile, I just picked a random fragment and added it to a simple, square grid. Over all, it’s OK, but I think next time, I will make the grid with larger squares! This got a little tedious towards the end.

This started out with a leftover tangle, Carpet Daisy, from yesterday’s random tangles. I kept it for today because I wanted to use it with some other tangles for a “botanical” tile.
There wasn’t much of a string for this, Just a couple of loops. I filled one loop with the first section of Carpet Daisy. Then the bigger loop, I decided to fill with Chainlea. I wanted to use Plum Leaf so I added several, overlapping at the bottom.
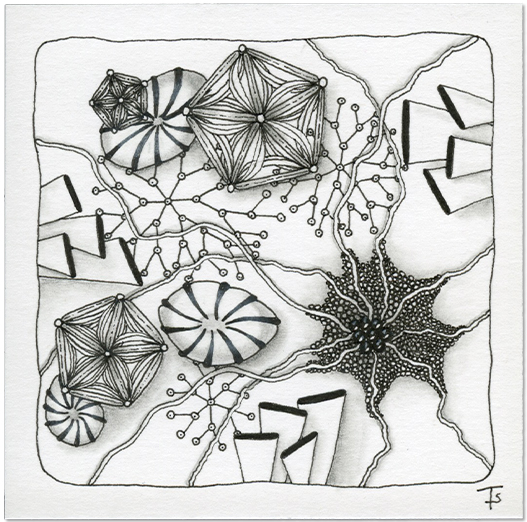
Random string, random tangles.
Lots of tangles for today’s tile!
This string had a lot of places to put tangles. I figured that I would end up repeating one or two, but that didn’t happen.
The first tangle selected was Intersection. I put it right in the middle because of it’s design and the dark areas. Ruutz was the second tangle that came up and I saw right away how I could use it along the string to frame the center area. The rest of the tangles I added as they came up. Fortunately, it all worked out well!

Random string, random tangles.
I have a small set of plastic french curves that I use for a variety of things. Today, I used the largest one to create the string on my tile. It works well to create graceful lines that aren’t too complicated.
After drawing the string, I randomly picked tangles, assinging them to the various spaces as I was going along. When Kettelbee came up, I immediately chose to put it on the central-most line. I also chose to put the Diva-Dance in the two smalles spaces.
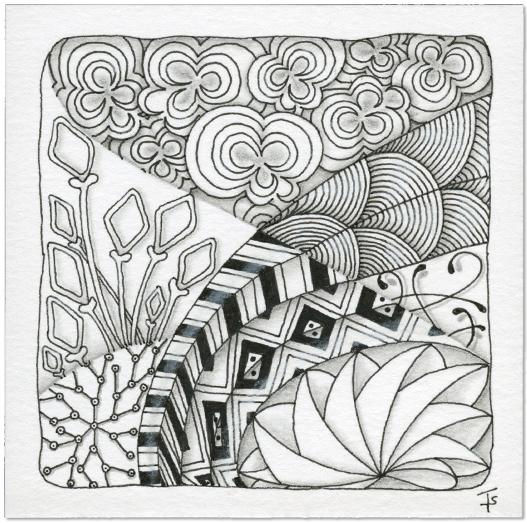
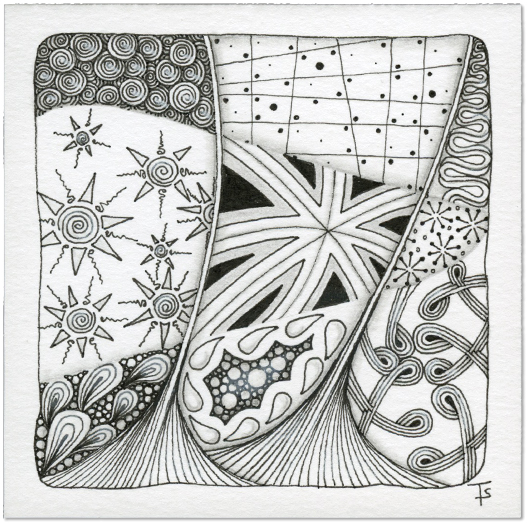
Random String, random tangles.
At first, I wasn’t sure how these tangles would work out together. But looking at the string, and assigning them places I could begin to see how this might look.
I like having those strong, dark areas in the middle. I like the “swoop” of that area to the right. The lighter tangles on each side help balance things out, and the Pop-Cloud doesn’t overwhelm the tile.
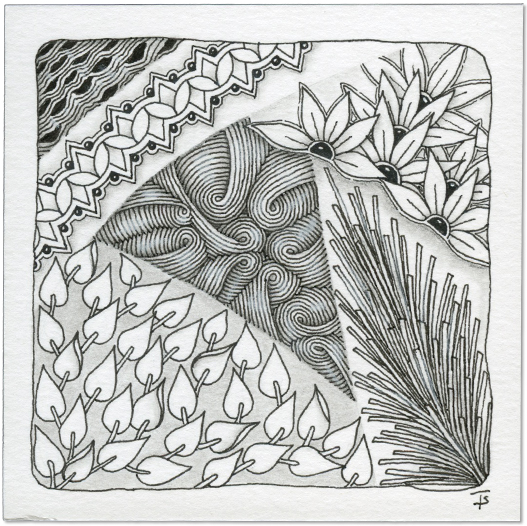
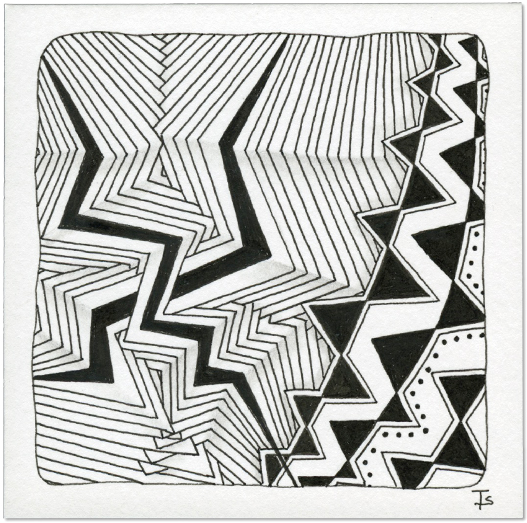
Random string. Random and selected tangles.
This tile started with the string. When it was drawn, I really hoped I got a tangle from the random draw that would fit well in that ribbon area at the upper right. I didn’t, so I decided to put Zenith there.
Other than that, the rest of the tangls here appeared in the random tangle selection. I like the mix of botanical and line tangles. Some of these I haven’t drawn in a while, so they were fun to do. I particularly enjoyed drawing Petal Puddle!